ONE NEST HOMES
  • Home
  • Services
    • Occupied Staging
    • Vacant Staging
    • Fixer-Uppers
    • Design Services
  • Gallery
  • Contact
  • FAQ's

DIY Wainscoting - A "How To" Guide to Installing Your Own Wainscoting, Step by Step

10/31/2018

1 Comment

 
Picture
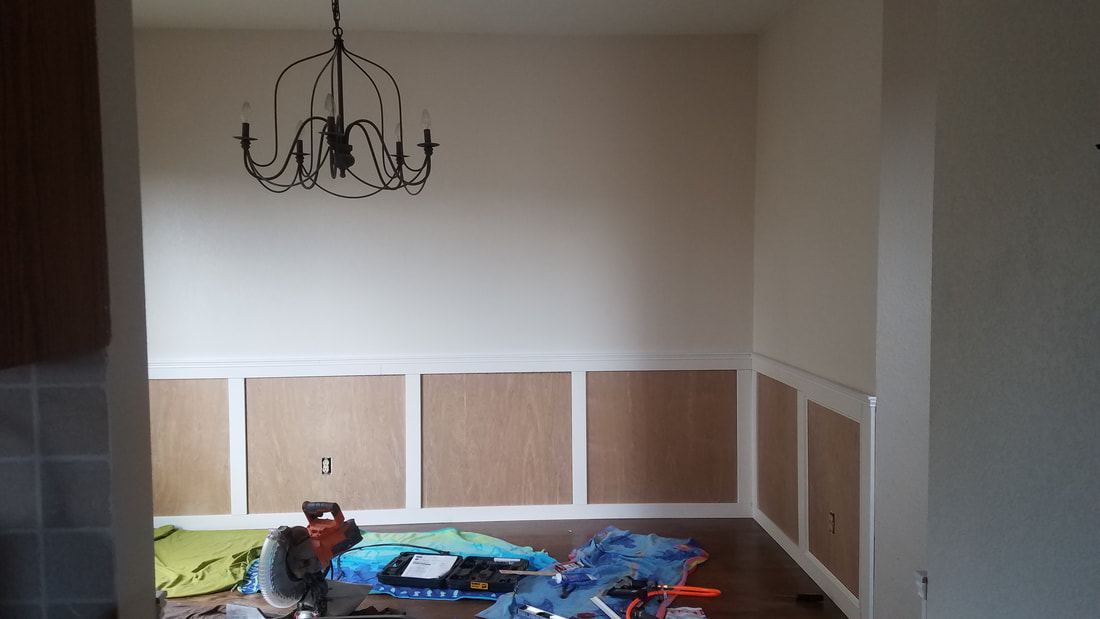
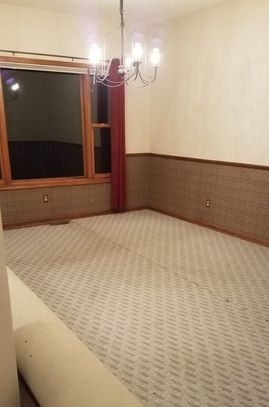
Like a good suit or the perfect LBD (little black dress), wainscoting and trim work are always in style…and unfortunately in short supply in many track homes. Trim work is an incredibly easy place to start with home improvements, even if you are new to the DIY scene or have limited experience with woodwork. It offers lasting value you can enjoy now and reap the benefits from when you sell.

Case in point, my dining room:
It’s a lovely space with lots of light and an equal amount of hideous, dated wallpaper caped with cheap oak chair rail.

How do you get rid of ugly wallpaper? Cover it up!

After thirty seconds of consideration I realized I had two options…scrape and re-texture or cover it up.
It was a no brainier. I’ll take the smell of fresh cut wood and gorgeous wainscoting any day over messy chemicals.
I’m a little late posting this as it’s a project I finished a few months ago, but I wanted to walk you through the process to show you how easy it can be and what a difference it makes to a space. And yes, I said easy! This was done in less than a week, in-between work, preschool and elementary school drop offs (#momlife) and after the kids went to bed in the evenings.
"Don't be afraid of power tools; a table saw is just a big-girl's paper cutter..."

1. Plan your wainscoting style!
Before you start, hit up Pinterest for some ideas (click HERE to see my board for this project...it's Pinterest y'all, I got a little distracted so there are some other gorgeous ideas in there too, including paint colors) and find a design that suits your taste and complements the style of your home. I'm seriously in love with beadboard and had originally planned on using it in this dining room; however, this is just isn't sort of house and it would have looked contrived and out of place. Find the sweet spot between what you love and what works with the style of your home.  

2. Measure and go shopping!
Head to your local hardware store and pick out the pieces you want to use. Purchase just enough to make one square; take it home, and tack it to the wall or lay it out on the floor so you can spend a couple days looking at it. This can save you so much headache later on when you get halfway through your project and decide you want a slightly different style.

Once you've settled on a design, go ahead and purchase all the material you'll need...measure carefully and buy extra!

Tips:
  • Before you go measure the lengths of your walls, and make a shopping list of how long each piece should ideally be.
  • For larger pieces (rails and stiles) do not add your total linear feet together! You need to know exactly how long each piece of material needs to be. For example: you write down on your list that you need 15 feet of material for stiles, and you buy 16 feet of material at the store. When you get home you realize you actually needed (3) 5' lengths and the two 8' boards you bought aren't going to look very good pieced together.
  • If you are purchasing by-the-foot material, cut your pieces based on the lengths you will need + an extra foot (ie you have a 5' wall then make sure you cut that piece to 6' to ensure you have enough margin for error, banged up ends, and miter cuts.

I've looked at tons of the wainscoting "kits" and while I'm sure they have a place, it's just not in my life. I think wainscoting should be unique to the space, and creating your own design and buying the material piece by piece gives you that flexibility...both in design as well as installation options. When you create your own design it's easier to work around the unique challenges of your space.

3. Demo time!
Here's a "before" shot...yes that's carpet getting rolled up. Most baseboards are installed before the carpet, which means the carpet is butted up against them and you can't take off the boards in one piece without loosening the carpet. Before starting, take into consideration whether you will need to reuse your baseboards or if they will be replaced. If reusing the material you'll want to be careful when removing them; pull back the carpet and pad so that you can remove the boards without cracking them. If you start loosening carpet be aware you will likely have to hire a carpet installer to stretch and tack for you (usually not too expensive). For this room the carpet will be replaced with hardwoods; however, I needed to save some of the baseboard material to use in another area of the home...use a small pry bar, start at one end and gently loosen the baseboards at each nail, working your way down the length of the board. They should pop right off! Use a pair of pliers to remove any nails still remaining in the base of the wall.

Picture

4. Prep your space and get your tools ready
Picture
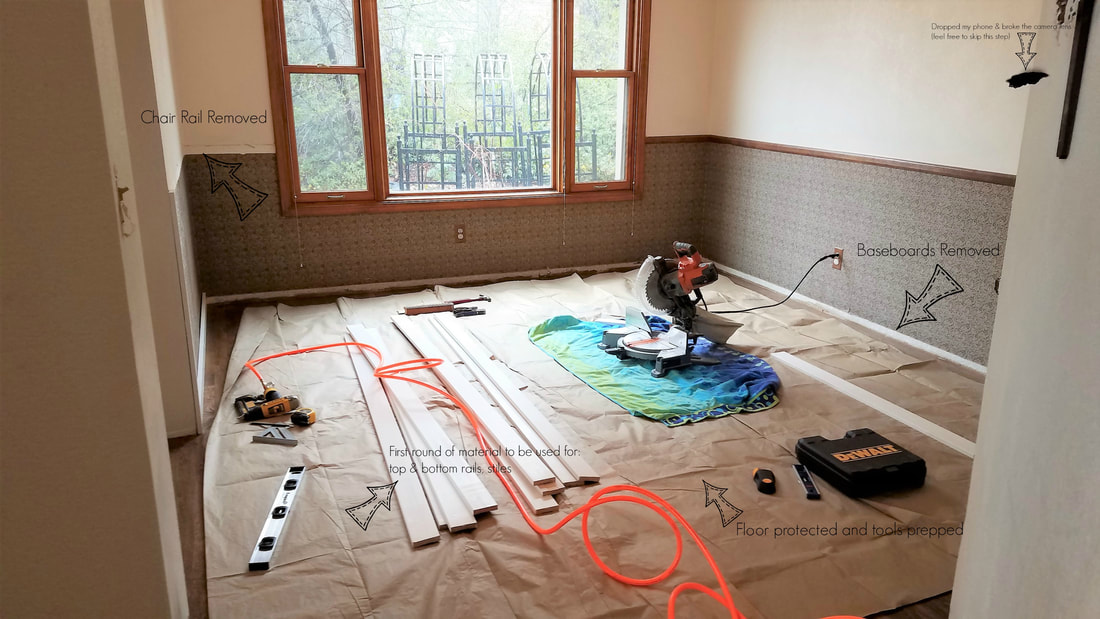
First of all, if you've never used power tools and are about to stop reading, PLEASE stick with me!
I know exactly what you are thinking..."I don't own power tools, they are expensive, and I'll probably break something or chop off a finger." But I promise you, if you have even a slightly crafty bone in your body, have used a paper cutter, or ever enjoyed scrap booking you can totally do this!  And you don't have to buy the most expensive brands with the most features; we're using just a few very basic tools, and it's an investment that will last you for years!
~ EQUIPMENT CHECKLIST ~
For those who value speed and accuracy (or are too lazy or lack the upper body strength to use hand tools for days on end) you will want to have:
  • miter saw (pictured above)
  • nail gun w/ nails (I shoot larger pieces with 2" 18 GA brad nails)
  • pin nailer w/ pin nails (headless pin nails for finishing work)
  • air compressor, hose, and attachments
  • level, tape measure, hammer, pliers
  • rasp (optional) and sand paper for finishing work
  • construction square (the triangle thing that help you make right angles)
  • stud finder (or a finger will do if you are good)
  • small pry bar for removing existing baseboards or trim
  • construction adhesive (such as Liquid Nails or StrongStick)
  • painters caulk (large tube and caulk gun)
  • painters tape
If you are dead-set on doing this the pioneer way and avoiding power tools then you will want to pick up the following:

  • miter box/saw
  • headless trim nails
  • tiny gauge finishing nails
  • a nail set (for countersinking aforementioned nails)
  • large bottle of ibuprofen for when you've repeatedly smashed your fingers trying to use your nail set 
  • ear plugs for your family so they don't hear the many "kind" words you have to say to your miter box and the junky saw it came with

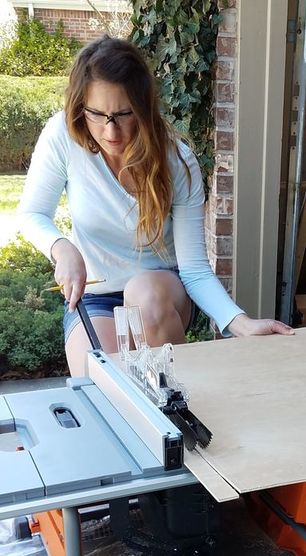
5. Run your rails
Start by running your outside stiles since you will want to but up to those; then run all of your bottom and top rails, starting at one end and working your way around the room. Yes, that's me in the window at like 2a, working blissfully through the uninterrupted wee hours of the night. Sleep is overrated. Wainscoting is not!
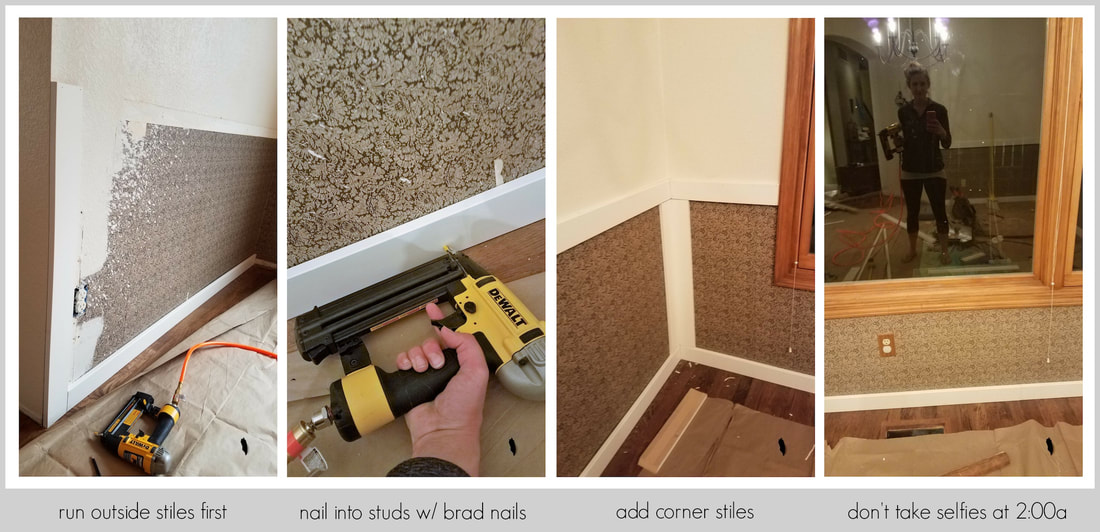
Picture
 ~ MITER CUTS ~
Picture
  • When you are running your bottom and top rail, I find it's easiest to: miter the end of your first piece of material and tack it lightly to the wall, then hold up your second piece of material and mark your cuts. This will help you get tighter seams than if you used your tape measure alone.
  • It's up to you if you want to miter inside corners; let your design guide you. Since I'm using stiles in the corners you won't see the top edge of the bottom rail, so I didn't bother with a miter cut there.

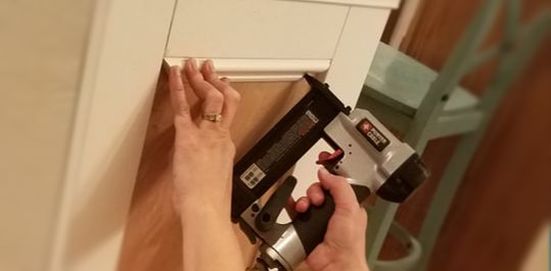
6. Add your stiles
Go ahead and cut all of your styles and prop them up in position; due to varying wall lengths you likely won't be able to get all of your panels the exact same size, but you will be able to tell visually if it looks good, or if you want them closer or further apart.

The window area gave me so much grief; in additional to creating some odd shapes the silly thing isn't even centered on the wall! My original plan for panel width also had to change due to an outlet that was smack dab where I needed to place a stile. Ultimately I ended up with much wider panels than I'd originally thought becasue it just felt better in the space and made the room look larger.

Picture
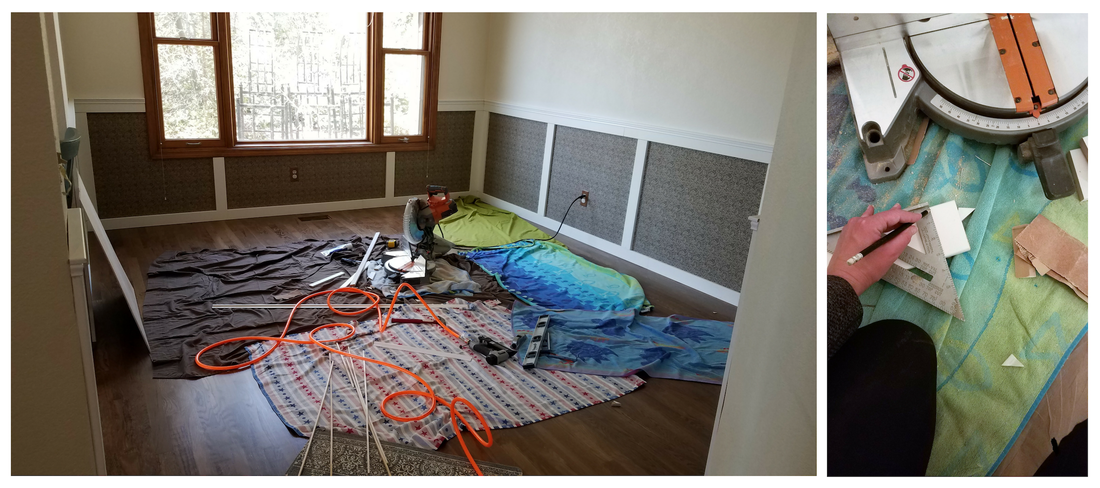
Use your miter saw to cut your stiles, and be sure your blade is at exactly 90 degrees! You will want the seam where the stile meets the top rail to be as tight and square as possible. Attach stiles to the wall with your brad nailer.

7. Cut your panels
If you are installing over a nice clean wall and trying to save a little money this is an optional step. If you don't have a lot of texture on your walls you can let the wall itself show through as the panel. It's not going to look quite as tailored and you will be able to tell it's drywall rather than actual paneling, but it can still look good, especially if you plan to do a two tone paint design, with your trim one color and the "panels" another.
This was my favorite part, as the wallpaper finally started disappearing!

For my design I'm using 1/4" birch plywood for the panel insert. Many hardware stores will make straight cuts for you in store if you need your plywood cut down, but their cuts aren't exact and they often won't make cuts under 10"...best best is to invest in a table saw of your own (or borrow one).

You can totally get away with a small, portable table saw for this project. However, I will say that if you have space to store a larger one and think you will use it then swing for a nice one that can more easily accommodate larger pieces. It just makes life easier.

Don't be intimidated...measure twice, work slowly and carefully, use a push stick and safety glasses, and you will be a pro in no time.

A table saw is nothing more than a big-girl's paper cutter, so get in there and have fun! Just watch your fingers ;-)

Picture
Before cutting, check which way your plywood sheets bow; you want to cut your panels so that the the edges bow toward the wall, with the center bowing out towards you. This will ensure that there won't be additional outward pressure put on your finish trim...we will be securing the finish trim with tiny pin nails, so we don't want any unnecessary pressure which could make it come loose over time.

Cut one panel at a time; air on the "fat" side, test for fit, and trim down as needed.
Use a pocket rasp to shave  off a few millimeters at a time to ensure a perfect fit (or to smooth rough edges).

Once panel fits perfectly, mark and cut holes for outlets as needed. I punched a pilot hole with with the drill, then used an orbital jigsaw to cut the rest of the whole (though you could use any small hand saw and I'm sure a real carpenter would have a better suggestion).

Picture
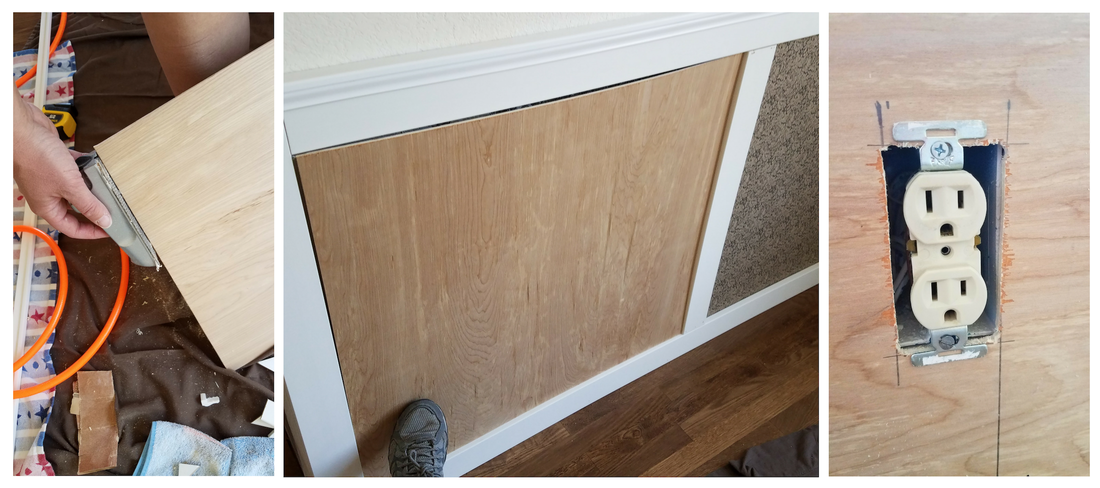
When your panel is completely ready for install:
  1. Carefully remove the screws that secure your outlets to the plastic housing box (you can shut off the breaker for safety if you like).
  2. Lace the back of the panel with a quick grab construction adhesive; this helps the panel lay flat against the wall and prevent bowing. You likely won't be catching many (if any) studs, so the adhesive is important in making sure the heavy plywood panels are secured well. Make sure to run a line of adhesive around outlet holes as well.
  3. Place your panel, gently pulling the outlet brackets to the front side of the panel, and press well to make sure the adhesive sticks.
  4. Use your brad nailer to secure the edges of the panel, being sure to keep close to the edges so the nail holes will be covered by trim.
  5. Replace your outlet screws. If the original screws are too short to accommodate the additional thickness of the panel you can just replace with longer ones. 
  6. Your panel is done, nice work!
Picture

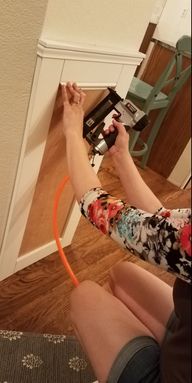
8. Add your inside trim
Picture
This part will go pretty fast! Make one cut at a time and secure that piece of material with your pin nailer before moving on to the next piece; this will help you keep your miters as tight as possible since each piece will be a custom cut. Always cut "fat" and shave down if needed.
Picture

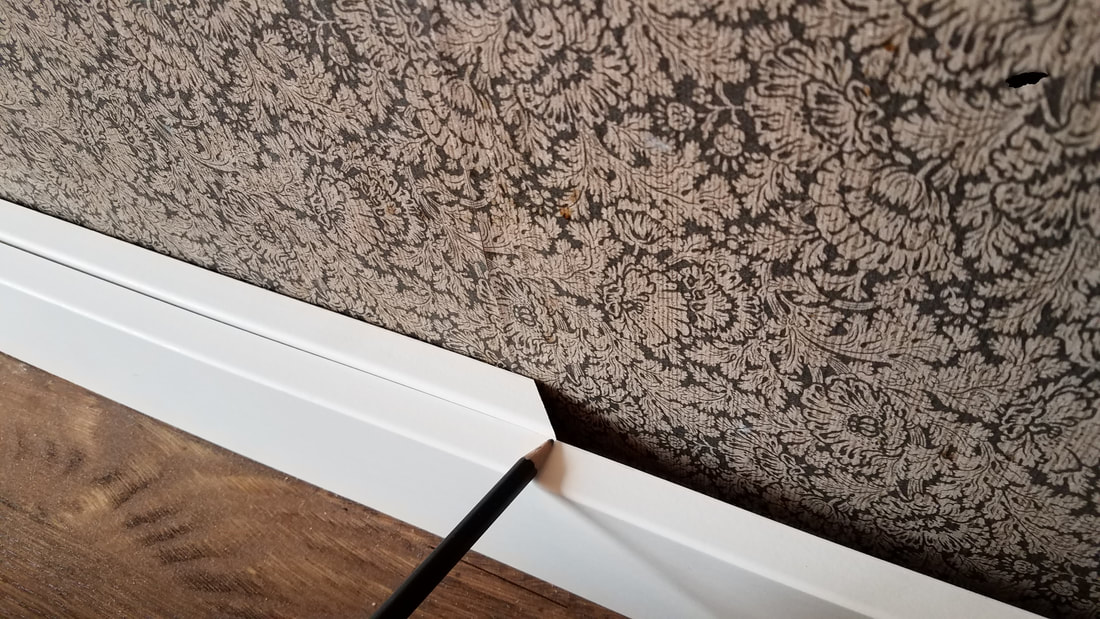
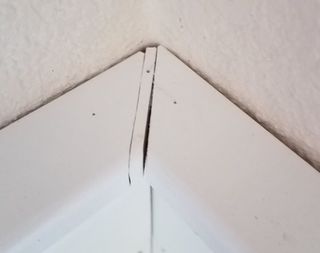
9. Add your crown and top cap
I had so much fun putting this on I nearly forgot to take pictures! I was using two types of cap molding since that's what I could find in stock at my local Home Depot and I liked the look of the layers together...so, my "cove" had to go on first and then the actual cap. Typically you'd add the cap first (the flat piece on top) and then the cove beneath it.

When you start, begin with your exterior corners so that any joints are further along down the wall and not as noticeable. Use your pin nailer to secure each piece as you go.

 ~ HOW TO MANAGE EXTERIOR CORNERS ~
Picture
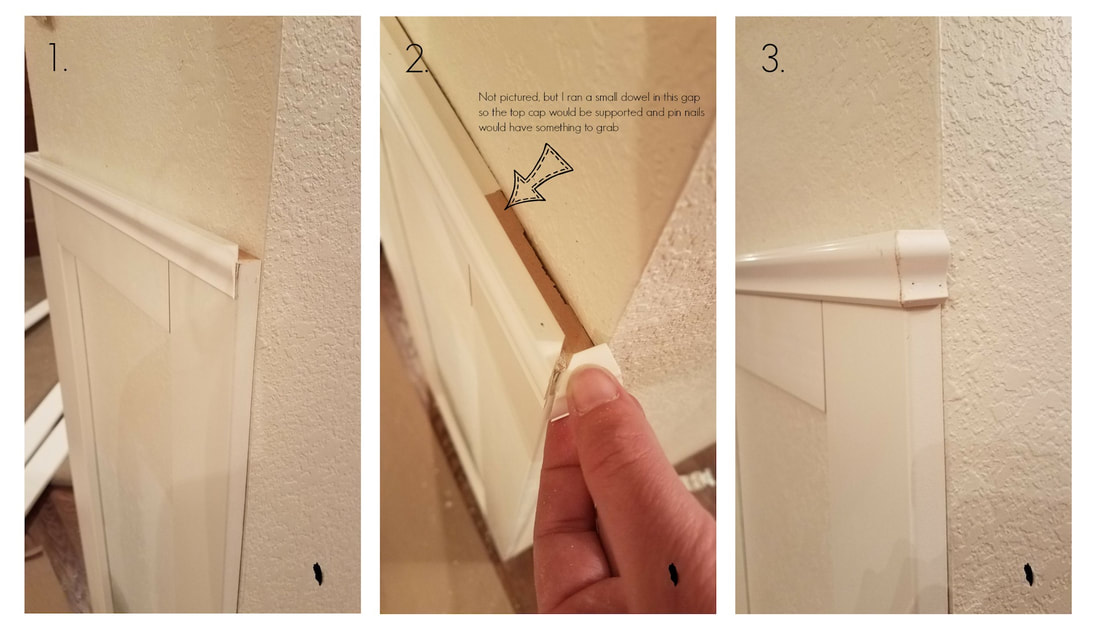
When working with exterior corners you will want to ensure you have a finished edge showing! To do this, simply miter the main piece of material as pictured (1) and then cut a small section to fit in along the end (2). You'll have a lovely finished edge showing from every angle (3), and your friends will be amazed at your skill and attention to detail. Just don't tell them how easy it was!

For the top cap I completed the exterior corners like this:
Picture

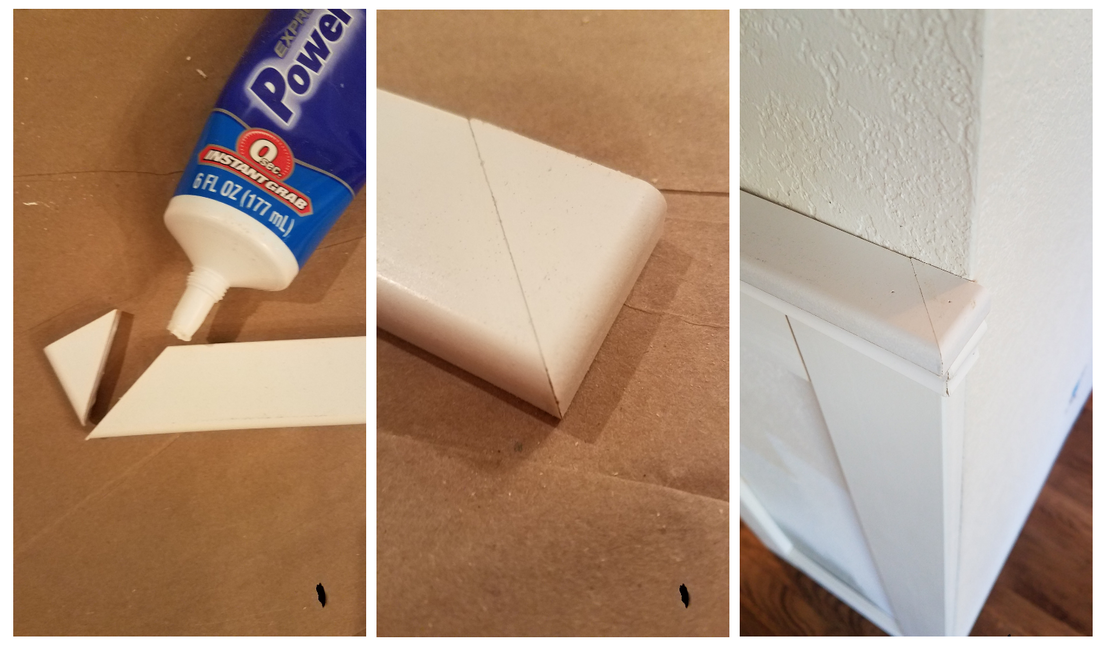
10. Polish off your trim and caulk
Whether you cut a little too short, have a small gap, or are trying to salvage a piece of material that is just a tinsy bit too short (see photo), you are bound to have a few gaps here or there. As long as they are small don't worry about it too much.

Here you can see where I ran out of material, and rather than running back to the store for another full piece I just used some scrap to fill in the gap. It's in interior corner, was cut on a 45 to match up with the end of the adjoining piece and once it was caulked you'd never know the difference!
Picture
1. Use fine grain sand paper to smooth corners and joints
2. Caulk!
Picture
Picture
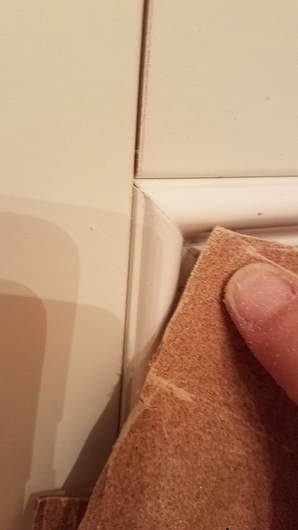
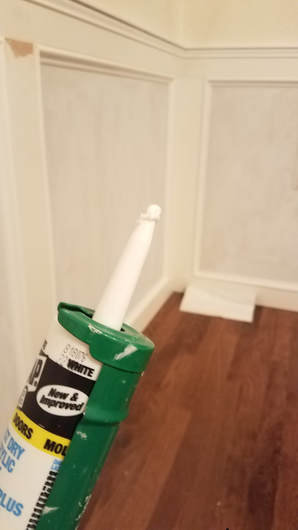
Tips for perfect caulking:
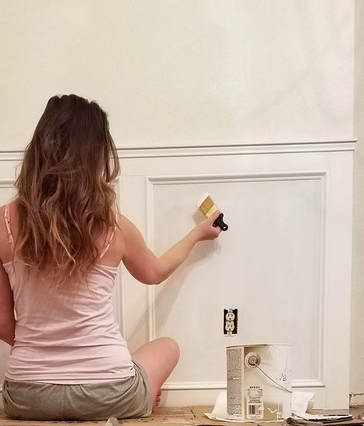
  • Cut your tip on an angle and smaller than you think you need; small beads are best and you can always cut it a little larger if needed.
  • Take your time! Smooth caulk is vital to a flawless paint job and you've worked too hard already to have messy caulk or gaps detract from what is soon to be a work of art.
  • Work in small batches; caulk smooths best when it's fresh.
  • Start at one corner and run a bead to the next, then smooth it out.
  • Caulk every joint and line. Pay special attention to the most visible areas (ie where your top cap meets your wall).
  • Fill any exposed brad nail holes; pin nails don't need caulking as primer and paint will cover them easily.
  • Use a caulk gun! This is way too big of a project to mess with the small tubes.
  • Have warm water and lots of paper towel handy. I've tried every tool and trick for smoothing caulk, and I'm a staunch believer that the best method, hands down, is a damp finger.

11. Prime and paint
You're almost done! Caulk and paint are the icing on your cake, so take your time and make sure it's smooth.

I used three coats of primer on all bare wood surfaces (my plywood panels) and two coats on pre-finished trim pieces. Topped that with two good coats of trim paint.

And yes, I hand brushed every coat. Thought my arm was going to fall off but it was totally worth the extra time and effort. Roller texture on otherwise gorgeous trim is what nightmares are made of!

Yeah, I'm in my pajamas, don't judge...no idea what time this was but it was after I got the kids in bed, and I was putting up new pantry shelves between each coat to give them time to dry. I'll show you my new pantry in another post!)
Picture
Picture
Picture

12. Admire your handiwork, take lots of pictures, and share them with me!
Have fun moving everything back into your space and decorating! And don't forget to leave me comments and share photos :-)
Picture

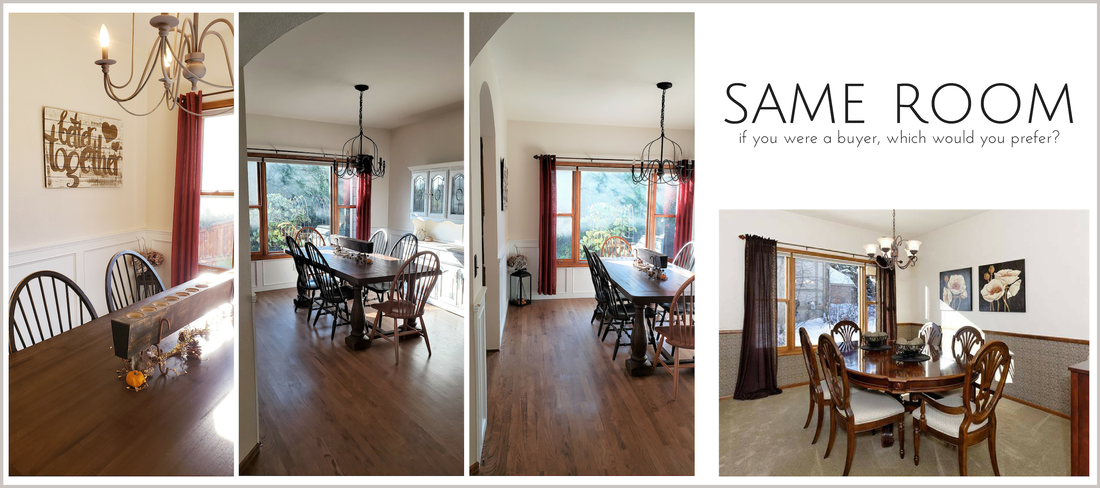
What's your next project?

1 Comment
Redhead Escort Spring Valley link
3/10/2025 01:05:55 am

I love the idea that wainscoting can make a big difference in a space.

Reply


Leave a Reply.

    OneNest News

    Make sure to catch all the latest One Nest news, updates and posts by following us on Facebook and Twitter!

    Have a real estate, design, or staging question? Leave it in the comments and I'll get back to you right away!

    Archives

    May 2019
    March 2019
    November 2018
    October 2018

    Categories

    All

    RSS Feed

© COPYRIGHT 2015. ALL RIGHTS RESERVED.
  • Home
  • Services
    • Occupied Staging
    • Vacant Staging
    • Fixer-Uppers
    • Design Services
  • Gallery
  • Contact
  • FAQ's